Simply Scratch Made

  • Recipes
    • Appetizers
    • Breakfast
    • Dessert
    • Dinner
    • Lunch
    • Side Dish
    • Beef
    • Chicken
  • Homesteading
    • Gardening
    • Preserving the Harvest
  • About
  • Contact Me
menu icon
go to homepage
  • Recipes
    • Appetizers
    • Breakfast
    • Lunch
    • Dinner
    • Side Dish
    • Dessert
      • Cookies
    • Breads
    • Chicken
    • Beef
  • Homesteading
  • About
  • Contact Me
search icon
Homepage link
  • Recipes
    • Appetizers
    • Breakfast
    • Lunch
    • Dinner
    • Side Dish
    • Dessert
      • Cookies
    • Breads
    • Chicken
    • Beef
  • Homesteading
  • About
  • Contact Me
×
Home » Recipes

Pizza Sauce

February 9, 2022 by Sky Pilgreen Leave a Comment

This is my favorite go-to 5-minute Pizza Sauce recipe. It comes together quickly, tastes fantastic and freezer friendly. The best part? You probably already have everything you need right to make this pizza sauce right in your kitchen!

I make a lot of pizza in my home. More than I care to admit. My family LOVES pizza. Through the years I have made pizza sauce many different ways. I have found that this quick recipe tastes just as good as the ones I use to make that required long simmering times. Which makes this a great recipe to whip together if time is an issue.

Table of contents

  • Key Ingredients & Substitutions
  • How To Make Pizza Sauce
    • More Delicious Recipes

I make a lot of pizza at home, probably more than I should admit. Over the years, I've experimented with countless sauce recipes, from slow-simmered versions to roasted tomato blends. But this one? It's my go-to. It delivers all the rich, herby flavor of a classic pizza sauce without needing to simmer on the stove for hours. That means less time cooking and more time enjoying homemade pizza with my family!

Key Ingredients & Substitutions

  • Tomato Sauce - The base of the sauce! You can also use canned crushed tomatoes or diced tomatoes for a chunkier consistency.
  • Oregano & Basil - These classic herbs give the sauce its signature pizza flavor. Dried herbs work great, but if you have fresh, use them! If you don't have dried oregano and basil but have Italian Seasoning, use that!
  • Sugar - Balances out the acidity of the tomatoes. Don't skip it!
  • Red Pepper Flakes (optional) - If you like a little heat, add a pinch!

How To Make Pizza Sauce

Whenever I make this sauce, I always whip up a big batch and freeze the extra in ¼-cup portions. It makes weeknight dinners a breeze because I can just grab what I need, whether it's for a homemade pizza night or a quick batch of homemade pizza bagels for the freezer.

STEP 1
In a medium bowl, whisk together the tomato sauce, oregano, basil, garlic powder, sugar, salt, and pepper.

STEP 2
Taste and adjust seasoning if needed. If you like a bit of heat, stir in a pinch of red pepper flakes.

STEP 3
Use immediately or store in the fridge for up to 5 days. For longer storage, freeze in small portions for easy use later!

More Delicious Recipes

Pepperoni Alfredo Pizza

Pepperoni Pinwheels with Puff Pastry

Homemade Pizza Dough

Spicy Sausage and Olive Pizza

Tried This Recipe?

Leave a review below, I would love to hear how it turned out! ⭐⭐⭐⭐⭐

FOLLOW ME on Facebook, Pinterest, and YouTube to stay connected!

📖 Recipe

Pizza Sauce

Pizza Sauce

This homemade pizza sauce is quick, easy, and full of flavor! A no-cook, 5-minute recipe perfect for homemade pizza, pizza bagels, and more.
No ratings yet
Print Recipe Pin Recipe
Favorite Favorited
Prep Time 5 minutes mins
Total Time 5 minutes mins
Course Sauces

Ingredients
  

  • 15 ounces tomato sauce
  • 1 pinch sugar
  • 1 teaspoon garlic powder
  • ½ teaspoon salt
  • ¼ teaspoon pepper
  • 1 teaspoon oregano dried
  • 1 Teaspoon basil dried
I always use Kosher salt in my kitchen! If using table salt, start with half the amount and adjust to taste, as it is much "saltier" by volume.

Instructions
 

  • In a medium bowl, whisk together the tomato sauce, oregano, basil, garlic powder, sugar, salt, and pepper.
  • Taste and adjust seasoning if needed. If you like a bit of heat, stir in a pinch of red pepper flakes.
  • Use immediately or store in the fridge for up to 5 days. For longer storage, freeze in small portions for easy use later!

Notes

This recipe makes enough for several pizzas.  I like to freeze what I don't use for the next time I make pizza.
Tried this recipe?Let us know how it was!

Chicken Noodle Soup

February 8, 2022 by Sky Pilgreen 2 Comments

Homemade Chicken Noodle Soup from Scratch! Packed with tender chicken, fresh vegetables, and a rich, flavorful broth, this easy recipe is the perfect comfort food for chilly days. Skip the canned version and enjoy the wholesome goodness of a scratch-made soup that's just like Grandma's. It's cozy, nutritious, and full of flavor-perfect for lunch, dinner, or meal prep!

This recipe is the definition of comfort food-simple, hearty, and satisfying, just like Grandma's homemade chicken noodle soup. It brings back memories of kitchens filled with the aroma of simmering broth and bowls made with love. Now, you can recreate that same warmth and nostalgia in your own home with this easy and flavorful recipe.

One of the best things about this dish is how versatile it is. Making soup from scratch allows you to use fresh, wholesome ingredients and enjoy the satisfaction of a homemade meal. It's a great way to make the most of leftover meats and veggies while packing lots of nutrition into one dish. And if you have leftover turkey, it makes a fantastic alternative to chicken in this recipe!

My childhood favorite Vegetable Beef Soup is another great soup that is perfect for using up leftovers!

My Latest Videos

Key INGREDIENTS & Substitutions

  • Chicken- This recipe uses boneless, skinless chicken breasts. A whole chicken or even leftover rotisserie chicken can be used.
  • Vegetables- A combination of onions, celery and carrots are used in this homemade chicken noodle soup.
  • Chicken Stock- For the base of this soup use a good quality chicken stock. Water is also needed.
  • Seasonings/Spices- This chicken noodle soup is flavored with a combination of oregano, thyme, garlic powder, bay leaf, salt and pepper.
  • Noodles- I really like using egg noodles for this soup. Use whatever you have on hand.

The Seceret to a flavorful chicken noodle soup base

When making soup, I've found that a good-quality stock is the key to enhancing its flavor. I love using homemade chicken stock, but if you don't have any on hand, don't worry-store-bought stock will work just fine.

If stock isn't available, you can quickly create a flavorful broth while cooking the chicken in this recipe. Simply add onion, celery, carrots, and fresh herbs to the water as the chicken cooks. Once done, strain the broth and use it as a base for your soup. This simple step will significantly elevate the flavor of your dish.

It's important not to rely on plain water, as it won't provide the same depth and richness. If you'd like to make your own stock for future recipes, check out this easy recipe for homemade chicken stock. It's a great way to always have a flavorful base on hand for soups, stews, and more!

Serving Suggestions

Crackers are my go-to side for chicken noodle soup-they pair perfectly with the warm, comforting flavors. A fresh side salad or a crusty, buttered piece of bread are also wonderful additions to round out the meal. Whether you're keeping it simple or adding variety, these sides make a hearty bowl of soup even more satisfying!

Tips For Freezing

Chicken Noodle Soup freezes nicely and can be frozen with or without the pasta. When I am making this soup for the freezer, I like to make it without the noodles and just cook the noodles when I serve the soup.

Freezing in Airtight Containers:

Portion and pour the soup into the containers, leaving 1 inch of space between the top of the container and the soup. Allow the soup to cool completely before placing the lid on. Label the container and freeze for about 6 months. Thaw completely before reheating.

Freezing in Freezer Bags:

Allow the soup to cool completely before filling the bags. Seal and label the bags. Lay them out flat and place in the freezer. Soup can be frozen for about 6 months. Thaw completely before reheating.

More Delicious Soup Recipes

Loaded Potato Soup

Creamy Curry Chicken and Potato Soup

Easy Taco Soup

Zuppa Toscana Soup

Tried This Recipe?

Leave a review below, I would love to hear how it turned out! ⭐⭐⭐⭐⭐

FOLLOW ME on Facebook, Pinterest, and YouTube to stay connected!

📖 Recipe

Homemade Chicken Noodle Soup

Chicken Noodle Soup

Homemade Chicken Noodle Soup from Scratch! Packed with tender chicken, fresh vegetables, and a rich, flavorful broth, this easy recipe is the perfect comfort food for chilly days. Skip the canned version and enjoy the wholesome goodness of a scratch-made soup that's just like Grandma's. It's cozy, nutritious, and full of flavor-perfect for lunch, dinner, or meal prep!
5 from 1 vote
Print Recipe Pin Recipe
Favorite Favorited
Prep Time 15 minutes mins
Cook Time 45 minutes mins
Total Time 1 hour hr
Course Dinner, Freezer Friendly, Lunch
Servings 6

Ingredients
  

  • 1 pound chicken breasts
  • 2 tablespoons olive oil
  • ½ cup onion small diced
  • 2 stalks celery small diced
  • 2-3 medium carrots small diced
  • 2 quarts chicken stock
  • 1 quart water
  • 1 ½ teaspoons garlic powder
  • 3 ½ teaspoons salt
  • ½ teaspoon pepper
  • 1 tablespoon fresh oregano chopped
  • 2 tablespoon fresh thyme chopped
  • 1 bay leaf
  • 3 cups broad egg noodles or your noodle of choice
I always use Kosher salt in my kitchen! If using table salt, start with half the amount and adjust to taste, as it is much "saltier" by volume.

Instructions
 

  • Start by boiling the chicken breasts in water. This step can be done ahead of time, allowing the chicken to cool before cutting or shredding the chicken. Set aside until needed.
  • Next, heat about 2 tablespoons of oil in a large stock pot over medium heat. Add the onion, celery, and carrots, and sauté for about 5 minutes, allowing them to brown slightly.
  • Add the chicken stock, water, dry seasonings and bay leaf to the pot. Bring the mixture to a boil, then stir in the noodles. Continue to cook uncovered for 8-10 minutes, or until the noodles are fully cooked.
  • Once the noodles are done, add the chicken and fresh herbs to the pot. Taste and adjust your seasoning as needed. Enjoy!
Tried this recipe?Let us know how it was!

The Essential Pizza Dough

February 8, 2022 by Sky Pilgreen 4 Comments

Sometimes you want to skip the delivery pizza and opt for a nice homemade pizza. Pizza night is always a hit in my home; my family loves it. This tried-and-true pizza dough recipe is definitely one to keep in your recipe book. It's simple, straightforward, and requires just a few pantry staples.

This recipe is simple and straight forward. With just a few ingredients from your pantry, and a little time you can have delicious homemade pizza dough ready for your choice of toppings.

Check out my easy 5-minute Pizza Sauce recipe and this Creamy Garlic Sauce for pizza.

My Latest Videos

Key Ingredients & Substitutions

  • Flour - Bread flour works great for this recipe, but plain all-purpose flour can be substituted if needed.
  • Yeast - Use instant or active dry yeast.
  • Honey - A small amount helps activate the yeast. Granulated sugar can be used a substitute.
  • Water - Warm water no hotter than 110°F.

💡Expert Tips

  • Adding the flour - As with most yeast dough recipes, the amount of flour needed is a guideline. The absorbency of the flour will play a huge roll in the amount of flour needed. When adding the flour to the dough you should always add it gradually, then check to see if the dough is sticky or tacky.
  • Let it Rest - If you have time, let the shaped dough rest for 10-30 minutes before baking for a fluffier crust.
  • Crispier Crust? - Bake on a preheated pizza stone or a perforated pizza pan for extra crispiness.

You will find that this pizza dough comes together pretty quickly. I have been using this recipe for several years now, and it is always a huge hit. You can bake your pizza immediately after you add your sauce and toppings for a thinner crust.

More Delicious Recipes

Pepperoni Alfredo Pizza

Breakfast Pizza

Spicy Sausage Pizza

Spinach Alfredo Pizza

FOLLOW ME on Facebook, Pinterest, and YouTube to stay connected!

Tried This Recipe?

Leave a review below, I would love to hear how it turned out! ⭐⭐⭐⭐⭐

📖 Recipe

The Essential Pizza Dough

The Essential Pizza Dough

This pizza dough recipe that comes together quickly and tastes great.  Makes 2 or 3 pizzas.  Roll it out thin and bake it immediately for a thin crust pizza.  Or roll it out thicker and let it rise for 10-30 minutes after adding the toppings for a thicker crust.   
4.50 from 2 votes
Print Recipe Pin Recipe
Favorite Favorited
Prep Time 15 minutes mins
Cook Time 15 minutes mins
Rest Time 1 hour hr 30 minutes mins
Total Time 2 hours hrs
Course Dinner, Lunch
Servings 2 Pizzas

Ingredients
  

  • 1 cup warm water
  • 1 ½ teaspoon active dry yeast
  • ½ cup warm milk
  • 3 tablespoons olive oil
  • 1 tablespoon honey
  • 2 teaspoons salt
  • 4 cups bread flour approximately
I always use Kosher salt in my kitchen! If using table salt, start with half the amount and adjust to taste, as it is much "saltier" by volume.

Instructions
 

  • In your mixer, mix together the warm water, yeast and warm milk and allow to sit for a few minutes so that the yeast has time to bloom.
  • Mix in the honey, salt, olive oil and half of the flour. Using the dough hook on its lowest speed, start to knead the dough. Continue kneading the dough and start adding 1 cup of flour at a time, only using enough flour for the dough to come together. You may or may not need all of the flour.
  • Once you have added as much flour as it needs, turn the speed up to the next setting and knead the dough for approximately 10 minutes. The dough should be soft and tacky, not sticky. Remove the dough hook, cover the bowl with a towel and set aside to proof until it doubles in size, 1 ½ to 2 hours.
  • Now for the fun part! Gently deflate your dough, separate into 2 or 3 portions. Using a little olive oil, to prevent sticking, roll each dough out. You can roll them thin or leave them a little thick. Transfer them to a lightly oiled pan and gently stretch back out if it shrinks a little.
  • Next sauce them up and add the toppings. From here you can bake them immediately in a 425° F oven or you can choose to cover them and let them rise for about 10-30 minutes then bake them. Bake each pizza for approximately 15 minutes.

Notes

This recipe yields 2-3 pizzas.  
Tried this recipe?Let us know how it was!

Creamy Garlic Pizza Sauce (Alfredo Sauce)

February 7, 2022 by Sky Pilgreen 1 Comment

Beautifully creamy and full of garlic and parmesan, this pizza sauce is absolutely delicious! It is nice to change up pizza night every now and then with this Creamy Garlic Pizza Sauce (Alfredo Sauce). It is the number one requested pizza sauce from my husband.

Creamy Garlic Pizza Sauce

What makes this creamy garlic pizza sauce different from traditional alfredo sauce that you put on pasta is the consistency, this pizza sauce is a tad bit thicker than traditional Alfredo Sauce.

This pizza sauce recipe makes a fantastic Pepperoni Alfredo Pizza, which is my husband's favorite pizza. It is also great on this Spinach Alfredo Bacon Pizza. Which is one of my favorite pizzas. If you are a spinach pizza lover, you will love the Spinach Alfredo bacon Pizza!

Ingredients

  • Olive Oil
  • Fresh Garlic
  • Heavy Cream
  • Parmesan Cheese - For the best flavor use freshly shredded and grated cheese.
  • Salt
  • Parsley - Fresh or dried.
Pepperoni Alfredo Pizza

I often make a small pizza using this creamy garlic sauce and top it with a garlic butter and herb mixture, and more parmesan cheese of course, and slice it like breadsticks. It is always a hit with my family!

How To Make Creamy Garlic Pizza Sauce

The full recipe is in the recipe card below.

Step 1 Sauté garlic for 30 seconds.

Step 2 Add heavy cream, parsley and salt. Bring to a simmer.

Step 3 Whisk in parmesan cheese until fully combined.

Step 4 Simmer for 3-4 minutes until the sauce reaches sauce consistency.

💡 Expert Tips

  • Once your sauce starts simmering, don't walk away! Heavy cream can scorch quickly. It heats and thickens fast, so keep an eye on it. You'll know it's ready when it coats the back of a spoon-it'll thicken even more as it cools.
  • Always use freshly shredded and grated parmesan cheese.
  • Asiago and Romano cheeses are great when used with the parmesan cheese.
Pepperoni Alfredo Pizza

More Delicious Recipes

Homemade Pizza Dough

Sheet Pan Pizza

Pizza Sauce

Breakfast Pizza

FOLLOW ME on Facebook, Pinterest, and YouTube to stay connected!

Tried This Recipe?

Leave a review below, I would love to hear how it turned out! ⭐⭐⭐⭐⭐

📖 Recipe

Creamy Garlic Pizza Sauce

Creamy Garlic Pizza Sauce (Alfredo Sauce)

This creamy garlic pizza sauce is a must try!  Made with parmesan cheese, cream and garlic, this recipe comes together quickly and is loaded with delicious flavor.
5 from 1 vote
Print Recipe Pin Recipe
Favorite Favorited
Prep Time 8 minutes mins
Cook Time 8 minutes mins
Total Time 16 minutes mins
Course Sauces
Servings 1

Ingredients
  

  • 1 Tablespoon olive oil
  • 1 clove garlic minced
  • 1 Cup heavy cream
  • ½ Teaspoon salt
  • 1 Teaspoon fresh parsley optional
  • ½ Cup shredded parmesan
  • 2 tablespoon grated asiago, romano or parmesan
I always use Kosher salt in my kitchen! If using table salt, start with half the amount and adjust to taste, as it is much "saltier" by volume.

Instructions
 

  • Add 1 tablespoon of olive oil to a small saucepan over medium heat.  Add in the minced garlic and sauté for 30 seconds.
  • Pour in all of the heavy cream and season with salt and parsley.  Bring to a simmer then whisk in all of the cheese.
  • Continue simmering for 2-4 minutes, or until the cream has thickened to sauce consistency.  Remove from the heat and let cool to room temperature before using.  

Notes

You can use shredded parmesan cheese or grated, or both for this recipe. I like to use shredded parmesan and a grated mixture of Asiago and Romano cheeses. 
This recipe yields enough to sauce two medium pizzas or one large pizza.
Tried this recipe?Let us know how it was!

Easy Southern Buttermilk Cornbread

February 5, 2022 by Sky Pilgreen 2 Comments

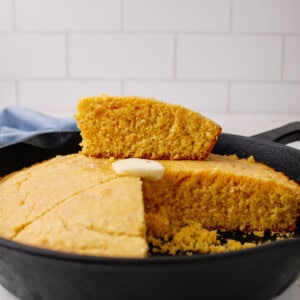
This Southern buttermilk cornbread is the ultimate dinner side dish. Baked until golden brown in a hot cast-iron skillet, it has a perfectly soft, buttery texture on the inside with an incredibly crispy crust on the edges. It is a traditional, savory Southern cornbread made completely from scratch with absolutely no box mix required!

Here in the South, there is always a fresh pan of warm cornbread on the table. Whether it was paired with a pot of pinto beans, a big bowl of classic homemade chili, a batch of Southern black-eyed peas, or crumbled into our Thanksgiving dressing, cornbread was a staple for every single comforting meal. To this day, I cannot eat a bowl of peas or beans without a thick piece of cornbread to soak up all the juices!

Table of contents

  • Key Ingredients & Substitutions
  • How To Make Buttermilk Cornbread
  • 👉 Sky's Tips for Buttermilk Cornbread
  • What To Serve with Cornbread
  • More Delicious Recipes

Making homemade cornbread is incredibly simple, and you likely already have all the basic pantry staples to make it. While I used to use vegetable oil in this recipe, I updated it to use melted butter instead because I love the rich flavor it adds. I've been making and testing this exact recipe for years, and switching to butter completely leveled it up, especially when you rub an extra tablespoon of butter over the top right when it comes out of the oven!

Whether you are looking for a quick weeknight side dish or something to serve alongside a comforting bowl of dutch oven beef stew, a cozy serving of vegetable beef soup, or a Sunday classic pot roast, this tried-and-true recipe is guaranteed to be a hit.

Key Ingredients & Substitutions

  • Cornmeal: Look for plain yellow or white cornmeal, not self-rising. This gives the cornbread its classic, rustic texture and true corn flavor.
  • All-Purpose Flour: Mixing flour with the cornmeal keeps the cornbread from becoming too crumbly, giving it a perfectly soft and tender crumb.
  • Buttermilk: Buttermilk is essential here. Its acidity activates the baking soda, causing the cornbread to rise beautifully while keeping it incredibly moist.
  • Melted Butter: I updated this recipe to use melted butter instead of vegetable oil for a much richer, classic flavor.
  • Oil (Optional Alternative): If you prefer to use oil or don't have butter on hand, you can use an equal amount of vegetable oil or melted shortening. It will work perfectly and still give you a great texture.
  • Baking Powder & Baking Soda: This powerful combination gives the heavy cornmeal batter the perfect amount of lift so it bakes up nice and fluffy.
  • Oil: You will need an extra 2 tablespoons of vegetable oil or shortening specifically for the cast-iron skillet. Heating the oil in the pan before adding the batter is the secret to getting those prized, ultra-crispy edges.

See the recipe card below for the full list of ingredients and measurements.

How To Make Buttermilk Cornbread

This scratch-made cornbread comes together fast in just a few simple steps. Here is how to make it:

Step 1

In a large bowl, whisk together the flour, cornmeal, salt, baking soda, and baking powder.

Step 2

In a separate bowl or large measuring cup, whisk together the room-temperature buttermilk, room-temperature egg, and slightly cooled melted butter.

Step 3

Pour the wet ingredients into the dry ingredients and stir just until everything is fully incorporated. Be careful not to overmix!

Step 4

Carefully remove your hot skillet from the oven, swirl the hot oil around the sides, and pour the batter right in. You should hear it sizzle!

Step 5

Bake for about 25 minutes until golden brown. Rub an extra tablespoon of butter over the top as soon as it comes out, slice, and serve!

See the recipe card below for the full recipe.

👉 Sky's Tips for Buttermilk Cornbread

  • Prevent Hard Clumpy Butter: To stop your melted butter from re-solidifying into hard chunks when it hits the wet ingredients, make sure your buttermilk and egg sit out to reach room temperature first. Also, let your melted butter cool down for about 10 minutes before mixing. If it still seizes up a little bit, don't worry! Just give the wet ingredients a good, vigorous whisk before stirring them into the dry.
  • Don't Overmix: Once you pour the wet ingredients into the dry, mix just until the flour and cornmeal are moistened. Overmixing can make the cornbread dense and tough instead of perfectly tender and crumbly.
  • Get the Sizzle: Don't skip preheating your cast-iron skillet with the oil in the oven! Pouring the batter into a screaming hot pan is the absolute secret to getting those prized, ultra-crispy edges that define a true Southern cornbread.
  • Top with Extra Butter: Rubbing a tablespoon of real butter over the top crust right when the pan pulls out of the oven keeps the top crust incredibly moist and adds a beautiful, rich finish.

What To Serve with Cornbread

  • Southern black-eyed peas or a slow-simmered pot of pinto beans to soak up all that incredible pot liquor.
  • A buttered slice of cornbread is the perfect pairing for dutch oven beef stew or a cozy bowl of Sausage and Bean Soup on a chilly evening.
  • A must for Red Beans and Rice! We also love serving it with Collard Greens!

I hope this Southern Buttermilk Cornbread becomes your new go-to cornbread recipe!

-Sky🩷

More Delicious Recipes

  • Oven Baked Pork Chops
    Oven Baked Pork Chops
  • Southern Style Green Beans
    Southern Style Green Beans
  • Chicken Fried Steak with Gravy
    Chicken Fried Steak with Gravy
  • Fried Potatoes and Onions
    Fried Potatoes and Onions

FOLLOW ME on Facebook, Pinterest, and YouTube to stay connected!

If you tried this Buttermilk Cornbread recipe or any other recipe on my blog, please leave a 🌟star rating and let me know how it went in the comment section below!

ADD US AS A TRUSTED GOOGLE SOURCE

📖 Recipe

Easy Southern Buttermilk Cornbread

This classic Southern buttermilk cornbread is made completely from scratch and baked in a hot cast-iron skillet for an incredibly crispy crust and a soft, buttery interior.
5 from 1 vote
Print Recipe Pin Recipe
Favorite Favorited
Prep Time 10 minutes mins
Cook Time 25 minutes mins
Total Time 35 minutes mins
Course Breads, Side Dishes
Servings 8 Servings
Calories 244 kcal

Equipment

  • 9-inch cast iron skillet

Ingredients
  

  • 1 cup flour all-purpose
  • 1 cup cornmeal
  • 1 ½ teaspoons salt
  • ½ teaspoon baking soda
  • 4 teaspoons baking powder
  • 1 cup buttermilk room temperature
  • ¼ cup unsalted butter melted and cooled
  • 1 large egg room temperature
  • 2 tablespoons oil any neutral tasting oil
I always use Kosher salt in my kitchen! If using table salt, start with half the amount and adjust to taste, as it is much "saltier" by volume.

Instructions
 

  • Preheat your oven to 425°F. Pour the 2 tablespoons of oil into a 9-inch cast-iron skillet and place the pan directly into the oven while it preheats so it gets screaming hot.
  • In a large mixing bowl, whisk together the flour, cornmeal, salt, baking soda, and baking powder until fully combined. Set aside.
  • In a separate bowl or large glass measuring cup, whisk together the room-temperature buttermilk, room-temperature egg, and slightly cooled melted butter until smooth.
  • Pour the wet ingredients into the bowl with the dry ingredients. Mix with a rubber spatula or wooden spoon just until the wet and dry ingredients are fully incorporated. Be careful not to overmix the batter.
  • Carefully grab your hot cast-iron skillet out of the oven using an oven mitt. Swirl the hot oil around the sides of the pan, then immediately pour the cornbread mixture into the center. Use a spatula to smooth out the top.
  • Place the skillet back into the oven and bake for approximately 25 minutes, or until the top is a beautiful golden brown and a toothpick inserted in the center comes out clean.
  • Remove from the oven and immediately rub 1 tablespoon of butter all over the hot top crust(optional). Enjoy!

Notes

  • Pan Size Alternatives: If you don't have a 9-inch cast-iron skillet, an 8x8-inch square metal baking pan or a 9-inch round metal cake pan will work just fine. Keep the bake time right around 20 to 25 minutes.
  • Handling the Melted Butter: Remember to let your melted butter cool for about 10 minutes before mixing it with the room-temperature buttermilk and egg. This prevents the butter from re-solidifying into hard chunks and ensures a completely smooth batter!
  • How to Store and Reheat: Store any leftover cornbread wrapped tightly in aluminum foil or in an airtight container at room temperature for up to 3 days. To get that crispy cast-iron texture back, reheat slices in a 350°F oven or a dry skillet on the stovetop for a few minutes until warmed through.

Nutrition

Calories: 244kcalCarbohydrates: 28gProtein: 5gFat: 12gSaturated Fat: 5gPolyunsaturated Fat: 2gMonounsaturated Fat: 5gTrans Fat: 0.2gCholesterol: 42mgSodium: 759mgPotassium: 132mgFiber: 2gSugar: 2gVitamin A: 261IUCalcium: 161mgIron: 2mg
Tried this recipe?Let us know how it was!

Pasta Meat Sauce

February 5, 2022 by Sky Pilgreen Leave a Comment

This homemade Pasta Meat Sauce is the ultimate from‑scratch weeknight hero-rich, hearty, and ready in about 40 minutes. It comes together easily with pantry basics and cooks down to a deeply flavorful sauce that your family will ask for again and again.

Over the years, this sauce has become my favorite freezer-friendly meal prep. I love making a double batch-one for dinner and one to stash away for future busy nights. Every bite sings with flavor thanks to sautéed mirepoix (onions, carrots, celery) and a slow simmer, making it feel special even on busy days.

👇 Jump to:

  • My Latest Videos
  • 🥣 Key Ingredients & Substitutions
  • 🍝 How To Make Pasta Meat Sauce
    • 💭 Expert Tips
    • More Delicious Recipes

If you enjoy this recipe, you might also like my baked rigatoni or this jumbo stuffed shells recipe.

My Latest Videos

This sauce works well as a spaghetti sauce as well as a lasagna sauce. Or it can be used with any other type of noodles. I often mix it with penne pasta, toss it in a casserole dish, top with mozzarella and bake it. It makes a fantastic baked pasta sauce!

🥣 Key Ingredients & Substitutions

  • Ground Beef - My go-to when making this easy pasta meat sauce recipe. Ground Italian Sausage is a great substitute.
  • Mirepoix (onion, carrot, celery) - Builds a flavorful foundation. You can also substitute or add to other vegetables like mushrooms or zucchini.
  • Garlic - Minced fresh garlic keeps it classic; garlic powder works in a pinch.
  • Tomato Sauce & Diced Tomatoes - The perfect combo for texture and depth. Use crushed tomatoes if that's what you have.
  • Herbs & seasonings - Dried basil, oregano, garlic powder, salt & pepper keep it simple. Or you can substitute with your favorite Italian Herb seasoning.

🍝 How To Make Pasta Meat Sauce

This sauce is totally from-scratch comfort in one pot-minimal fuss, maximum flavor.

STEP 1

In a large skillet over medium heat, brown the ground beef with 1 teaspoon of salt and ½ teaspoon of pepper. Drain excess grease and set the meat aside.

STEP 2

Add olive oil to the same pan. Sauté the onion, carrot, and celery (mirepoix) for about 8 minutes, until softened.

STEP 3

Stir in the garlic, dried herbs, garlic powder, remaining ½ teaspoon of salt, and ½ teaspoon of pepper. Cook for about 30 seconds, just until fragrant.

STEP 4

Return the beef to the pan and add the tomato sauce, diced tomatoes, and a pinch of sugar. Simmer uncovered for at least 20 minutes, stirring occasionally, to let the flavors come together. Taste and adjust seasoning if needed.

💭 Expert Tips

  • Freezer‑friendly: Divide into portions, cool completely, and freeze in airtight containers for 3-4 months.
  • Spaghetti tip: Cook 8 ounces of spaghetti noodles to pair with this sauce-perfect for 4-5 servings.

More Delicious Recipes

Chicken Alfredo Jumbo Stuffed Shells

Classic Meatballs

One Pot Italian Sausage Pasta

Creamy Chicken and Broccoli Pasta

FOLLOW ME on Facebook, Pinterest, and YouTube to stay connected!

 If you tried this Pasta Meat Sauce recipe or any other recipe on my blog, please leave a 🌟star rating and let me know how it went in the comments below!

📖 Recipe

Pasta Meat Sauce

Pasta Meat Sauce

This homemade pasta meat sauce is rich, flavorful, and made from scratch with simple ingredients. It's easy to make, freezer-friendly, and perfect for busy weeknight dinners.
No ratings yet
Print Recipe Pin Recipe
Favorite Favorited
Prep Time 10 minutes mins
Cook Time 30 minutes mins
Total Time 40 minutes mins
Course Dinner, Freezer Friendly
Servings 6 Cups

Ingredients
  

  • 1 pound ground Beef
  • 3 tablespoons olive Oil
  • 1 cup onions small dice
  • ½ cup carrots small dice
  • ½ cup celery small dice
  • 4 cloves garlic minced
  • 1 can tomato sauce 1 lb. 13 oz.
  • 1 can diced tomatoes 14.5 oz.
  • 1 ½ teaspoons salt
  • 1 teaspoon pepper
  • 1 pinch sugar optional
  • ½ teaspoon garlic powder
  • 2 teaspoons basil dried
  • 1 tablespoon oregano dried
I always use Kosher salt in my kitchen! If using table salt, start with half the amount and adjust to taste, as it is much "saltier" by volume.

Instructions
 

  • In a large skillet over medium heat, brown the ground beef with 1 teaspoon of salt and ½ teaspoon of pepper. Drain excess grease and set the meat aside.
  • Add olive oil to the same pan. Sauté the onion, carrot, and celery (mirepoix) for about 8 minutes, until softened.
  • Stir in the garlic, dried herbs, garlic powder, remaining ½ teaspoon of salt, and ½ teaspoon of pepper. Cook for about 30 seconds, just until fragrant.
  • Return the beef to the pan and add the tomato sauce, diced tomatoes, and a pinch of sugar. Simmer uncovered for at least 20 minutes, stirring occasionally, to let the flavors come together. Taste and adjust seasoning if needed.

Notes

    • Freezer‑friendly: Divide into portions, cool completely, and freeze in airtight containers for 3-4 months.
  • Spaghetti tip: Cook 8 ounces of spaghetti noodles to pair with this sauce-perfect for 4-5 servings.
  • This recipe makes about 6 cups of pasta sauce.
 
Tried this recipe?Let us know how it was!
  • « Previous Page
  • 1
  • …
  • 12
  • 13
  • 14

Welcome!

Welcome! I'm Sky, the creator of Simply Scratch Made. I’m passionate about helping home cooks make simple, delicious meals from scratch. From my kitchen to yours, let’s cook with confidence!


More about me

Cozy Fall Bakes

  • Cut pecan pie bars with shortbread crust.
    Easy Pecan Pie Bars with Shortbread Crust
  • Sweet Potato Coffee Cake with Pecan Streusel
  • Apple Fritter Bread
    Apple Fritter Bread
  • Old Fashioned Pumpkin Roll with Pecans
    Old Fashioned Pumpkin Roll with Pecans

Footer

↑ back to top

Explore

  • Recipe Index
  • About

About

  • Privacy Policy
  • Contact

Copyright © 2025 Simply Scratch Made on the Feast Plugin

Rate This Recipe

Your vote:


Let us know what you thought of this recipe:

This worked exactly as written, thanks!
My family loved this!
Thank you for sharing this recipe

Or write in your own words:

A rating is required
A name is required
An email is required