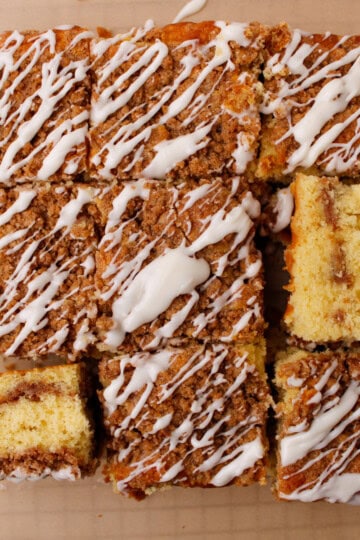
Strawberries, cheesecake, and crumb topping. I honestly can't think of a better trio. These homemade strawberry cheesecake bars bring all the cozy, from-scratch vibes and have this irresistible balance of sweet, creamy, and buttery crunch. They're the kind of dessert that gets everyone gathered around the pan, forks in hand, no plates needed.

This recipe starts with a buttery graham cracker crust, a creamy cheesecake filling, and fresh strawberries, all topped with a delicious crumb topping. These cheesecake bars are baked until perfectly set, chilled, and ready to steal the show at any gathering. You can cut them into neat squares for serving or do what my family does, just grab a fork and go for it straight from the fridge.
👇Jump to:
My Latest Videos
Nick (my husband) will pick cheesecake over any dessert any day. So naturally, when I was testing this recipe, I knew I had a solid taste-tester on standby. He gives these bars a solid thumbs-up every single time. His pro tip? Pop one in the freezer for an hour, it's like a strawberry cheesecake popsicle. As for me, I can barely wait for them to cool before I'm sneaking a bite. They are that good!
Key Ingredients & Substitutions
- Graham Crackers - You'll need 12 full sheets of graham crackers to make the crumbs for the crust layer. You can also use store-bought graham cracker crumbs to save a little time, which is about 1 ½ cups.
- Cinnamon (optional) - I love the warm, cozy flavor it adds to the crust. Totally optional, but definitely a delicious little twist.
- Strawberries - Use freshly diced strawberries. Frozen ones tend to release too much liquid and can make the cheesecake layer runny.
- Cream Cheese - Full-fat cream cheese gives you that classic, rich cheesecake flavor. Make sure it's softened before mixing.
How To Make Strawberry Cheesecake Bars
This strawberry cheesecake bars recipe is simple to make with a few homemade touches that make them extra special. Just follow the steps and you'll have the perfect from-scratch dessert ready to chill and serve!
STEP 1
Preheat your oven to 350°F and line a 9x9-inch baking pan with parchment paper, leaving an overhang for easy removal.
STEP 2
In a medium bowl, combine graham cracker crumbs, melted butter, sugar, and cinnamon (if using). Stir until the mixture looks like wet sand. Press the crust mixture evenly into the prepared pan and set aside.


STEP 3
In a large mixing bowl, beat the softened cream cheese until smooth. Add sugar, eggs, and vanilla extract. Continue beating until the mixture is smooth and fully combined.
STEP 4
Pour the cheesecake mixture over the graham cracker crust and spread it into an even layer. Sprinkle the diced strawberries in an even layer over the top.


STEP 5
In a small bowl, mix together the crumb topping ingredients until crumbly. Sprinkle evenly over the strawberries. Break up any large clumps.
STEP 6
Bake for 35-40 minutes, or until the center is set and the top is lightly golden. Remove from the oven and let cool completely at room temperature.
STEP 7
Transfer the pan to the refrigerator and chill for at least 1½ to 2 hours before slicing. Enjoy!

💡Expert Tips
- Room Temperature Ingredients: Make sure your cream cheese and eggs are at room temp to avoid lumps in the batter.
- Chill Time is Key: Don't skip the chill time. It's what helps the bars fully set and gives that classic cheesecake texture.
- Cutting Clean Bars: Use a sharp knife, and wipe it clean between cuts for those pretty, bakery-style squares.
- Blueberry Cheesecake Bars Twist: Want to switch things up? Use fresh blueberries instead of strawberries for easy blueberry cheesecake bars!
Frequently Asked Questions
Yes! These bars are perfect for making ahead. You can bake and chill them up to 3 days in advance.
Nope! These cheesecake bars don't require a water bath and still come out creamy and smooth every time!
More Delicious Recipes
FOLLOW ME on Facebook, Pinterest, and YouTube to stay connected!
If you tried this Strawberry Cheesecake Bars recipe or any other recipe on my blog, please leave a 🌟star rating and let me know how it went in the comment section below!
📖 Recipe

Strawberry Cheesecake Bars
Ingredients
Graham Cracker Crust
- 12 sheets graham crackers broken into crumbs
- ¼ cup granulated sugar
- 3 ounces unsalted butter melted
- 1 pinch cinnamon
Cheesecake Filling
- 16 ounces cream cheese softened
- ⅓ cup granulated sugar
- 2 large eggs room temperature
- 2 teaspoons vanilla extract
- 1 cup strawberries diced
Crumb Topping
- 3 tablespoons unsalted butter melted
- ¼ cup light brown sugar packed
- ¼ teaspoon vanilla extract
- ½ cup all-purpose flour
Instructions
- Preheat an oven to 350° F and line a 9x9 glass baking dish with parchment paper, leaving an overhang for easy removal.
- In a medium bowl, combine graham cracker crumbs, 3 ounces of melted butter, ¼ cup sugar, and pinch of cinnamon (if using). Stir until the mixture looks like wet sand. Press the crust mixture evenly into the prepared pan and set aside.
- In a large mixing bowl, beat the softened cream cheese until smooth. Add the ⅓ cup sugar, eggs, and 2 teaspoons of vanilla extract. Continue beating until the mixture is smooth and fully combined.
- Pour the cheesecake mixture over the graham cracker crust and spread it into an even layer. Sprinkle the diced strawberries in an even layer over the top.
- In a small bowl, mix together the 3 tablespoons of melted butter, 1 cup of flour, ½ cup of brown sugar, and ½ teaspoon of vanilla until crumbly. Sprinkle evenly over the strawberries. Break up any large clumps.
- Bake for 35-40 minutes, or until the center is set and the top is lightly golden. Remove from the oven and let cool completely at room temperature.
- Transfer the pan to the refrigerator and chill for at least 1½ to 2 hours before slicing. Enjoy!
Notes
- Room Temperature Ingredients: Make sure your cream cheese and eggs are at room temp to avoid lumps in the batter.
- Chill Time is Key: Don't skip the chill time. It's what helps the bars fully set and gives that classic cheesecake texture.
- Cutting Clean Bars: Use a sharp knife, and wipe it clean between cuts for those pretty, bakery-style squares.


Comments
No Comments