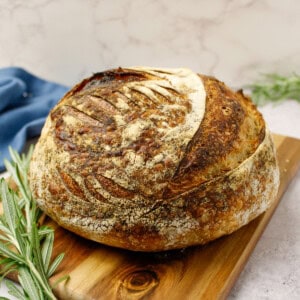
Rosemary Sourdough Bread with Roasted Garlic
This rosemary sourdough bread features a beautifully golden crust, a soft and chewy interior, and is packed with roasted garlic and fragrant fresh rosemary. It's the perfect bread for stews, pastas, and soups!
Ingredients
- 1 head of garlic roasted and mashed
- 2 tablespoons fresh rosemary roughly chopped
- 500 grams bread flour
- 350 grams warm water filtered
- 100 grams sourdough starter fed and active
- 10 grams salt
I always use Kosher salt in my kitchen! If using table salt, start with half the amount and adjust to taste, as it is much "saltier" by volume.
Instructions
- About 1 hour before you anticipate your fed sourdough starter being at its peak activity, combine the 350 grams of warm filtered water and 500 grams of bread flour in a large mixing bowl. Stir with a dough whisk or your hands just until no dry flour remains and a shaggy dough forms. Cover the bowl with a damp cloth and allow it to sit undisturbed for 1 hour to autolyse.
- After 1 hour add the mashed garlic, minced rosemary, 100 grams of active starter and 10 grams of salt to the dough.
- Begin kneading the dough using a traditional slap-and-fold technique on a clean surface, or perform a focused, gentle kneading motion right inside the bowl. Continue working the dough for about 5 minutes, or until it starts to smooth out, pull away from the sides, and cleanly incorporate all the garlic and herbs. Cover with the damp cloth and let rest for 30 minutes in a warm spot.
- The 15-Minute Intervals: After 30 minutes, perform your first stretch-and-fold. Grab one side of the dough, stretch it upward gently, and fold it over the center. Rotate the bowl 90 degrees and repeat until all four sides are folded. Cover and rest for 15 minutes. Repeat this stretch-and-fold process two more times at 15-minute intervals.
- The 30-Minute Intervals: Once the short intervals are complete, perform another stretch-and-fold, cover, and let rest for 30 minutes. Repeat this process two more times at 30-minute intervals (for a total of three 30-minute cycles). You will notice the dough becoming smoother, shinier, and holding its shape much better with each set.
- Bulk Fermentation & Shaping: Cover the dough with the damp cloth and let it sit undisturbed to bulk ferment at room temperature for several hours. The dough is ready to shape when it has roughly doubled in size, looks puffy, and shows a few air bubbles on the surface. (Note: This can take anywhere from 5 to 8 hours depending on the temperature of your kitchen).
- Turn the fermented dough out onto a lightly floured surface. Gently shape it into a tight round boule.
- Place the shaped dough seam-side down into a floured banneton basket, or into a bowl lined with parchment paper for effortless lifting later. Cover the basket with a plastic bag to lock in moisture and transfer it to the refrigerator to cold-retard overnight (aim for 12 to 14 hours).
- Scoring and Baking: One hour before you are ready to bake, place your cast iron Dutch oven (with the lid on) into the oven and preheat it to 500°F for 1 hour.
- When fully preheated, carefully remove the hot Dutch oven. If using the parchment paper method, gently lift the chilled dough out of the bowl by the edges of the paper, score the top deeply with a sharp lame or razor blade, and lower it directly into the hot pot. (If not using parchment, lightly flour the bottom of the hot pot, invert the dough directly into it from the banneton, and score).
- Cover the Dutch oven with its hot lid and place it into the oven to bake covered for 25 minutes. After 25 minutes, carefully remove the lid from the Dutch oven. Bake uncovered for an additional 15 minutes, or until the crust is deeply browned and caramelized.
- Carefully remove the bread from the pot and transfer it to a wire cooling rack. Allow the loaf to cool completely for at least 1 to 2 hours before slicing to let the interior crumb set perfectly. Enjoy!
Notes
If you keep your starter stored in the refrigerator between baking sessions, remember to pull it out the night before and give it a good feeding to ensure it's ready to go by morning.
If you choose to line your proofing bowl with parchment paper for quick handling, do not flour the inside of your hot cast iron Dutch oven. Simply score the dough while it is sitting safely on the paper, lift it by the parchment corners, and lower it straight into the preheated pot.
Nutrition
Calories: 1901kcalCarbohydrates: 383gProtein: 63gFat: 9gSaturated Fat: 1gPolyunsaturated Fat: 4gMonounsaturated Fat: 1gSodium: 3888mgPotassium: 528mgFiber: 13gSugar: 2gVitamin A: 127IUVitamin C: 1mgCalcium: 90mgIron: 5mg
Tried this recipe?Let us know how it was!