Roasted Chicken

Roasted chicken the easy way! Hands down, this is my favorite way to roast a whole chicken. This method cuts the cooking down tremendously and allows more of the chicken to be flavored. Spatchcocking your chicken allows quick, even cooking with great flavor!
What Does Spatchcocking a Chicken Mean?
Spatchcocking is removing the backbone of a chicken and laying it out flat. By doing this it allows the chicken to cook evenly. The breasts will not dry out while the legs and thighs are still cooking, which can be a problem when roasting a whole chicken.
Is it Really Better than Roasting the Chicken Whole?
In my opinion, yes! Not only are you able to roast the chicken evenly the chicken breasts will not dry out. You are able to season the chicken more, by seasoning the inside with spices and herbs. All of the chicken skin is also able to get nice and crispy. Which is arguably the best part! And let's not forget, it cooks so much faster!
Which is a bonus in my book!
How to Spatchcock a Chicken
It is really easy to spatchcock a chicken, probably a lot easier than you think. It may seem a little intimidating at first, but once you do it a few times it will be a lot easier. It doesn't take long to do either.
Cut out the spine
Turn the chicken so that the back of the chicken is facing you and the breasts are lying flat on the cutting board. With a sharp knife, (or kitchen shears) starting from the neck, cut along one side of the chicken's spine. Repeat this on the other side to completely remove the backbone.
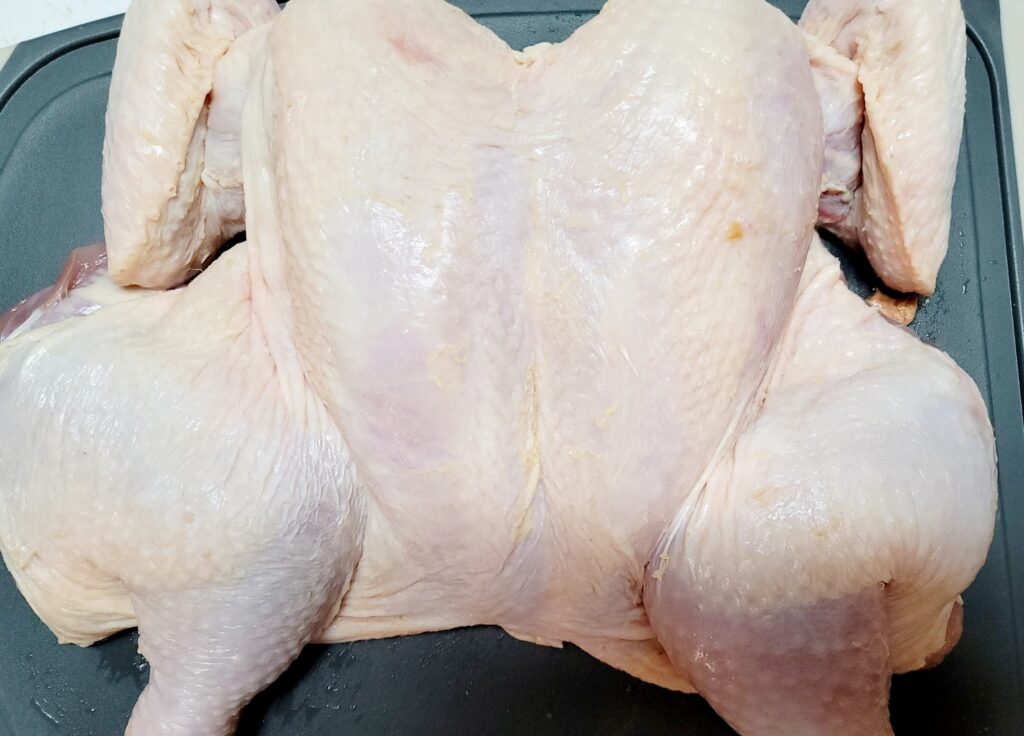
Flatten the Chicken
Now turn the chicken over and spread the chicken out. Using your hand press down on the chicken's breasts to flatten the chicken out. You will feel the breastbone break, allowing the chicken to spread out even flatter. And you're done, easy as that!
- Bring the chicken out of the refrigerator and remove it from the package an hour or so ahead of time. This gives the chicken time to come up to room temperature which allows it to cook more evenly.
- Pat the chicken's skin dry with a paper towel while the chicken is sitting out. The drier the skin, the crispier it will be when roasted.
- Alternatively, you can set the chicken out several hours beforehand or the night before and sprinkle a little salt on the chicken's skin. This is dry brining. Dry brining allows the chicken to release its moisture then soak it back up, along with the salt. The skin dries out and flavors the chicken at the same time.
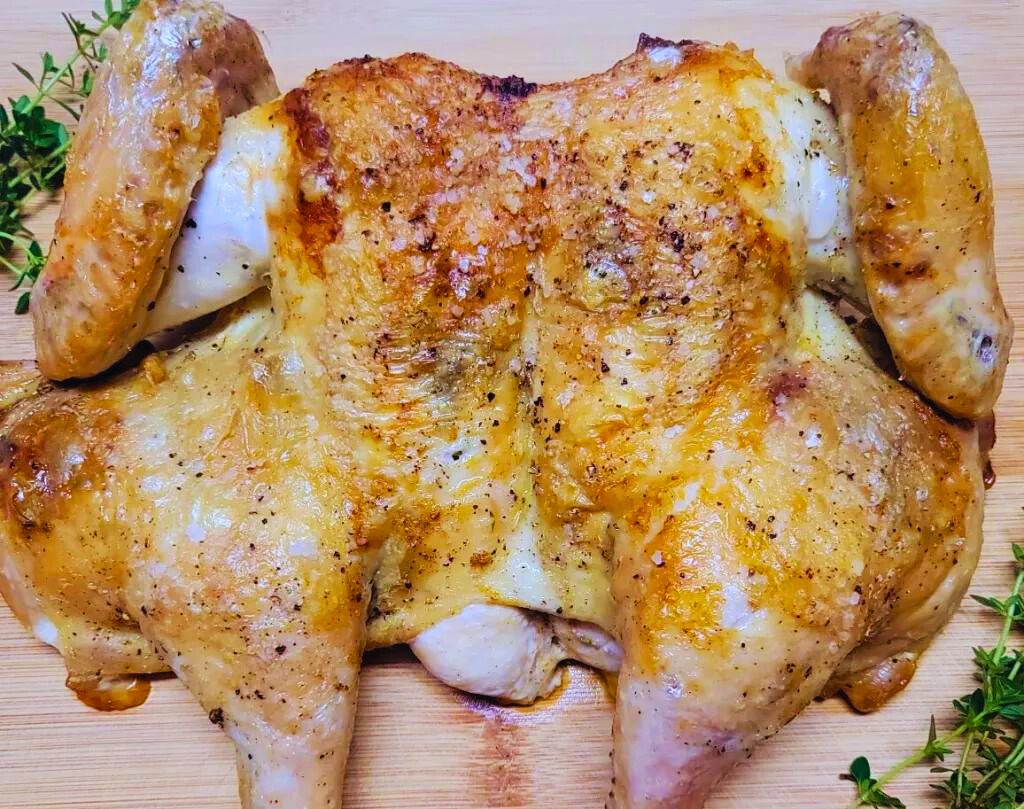
Perfectly Roasted Chicken every time. Spatchcocking the chicken allows it to cook faster and more evenly.
- 1 whole chicken (2-3 pounds)
- 2 oz butter (softened and divided)
- 1 lemon (zested)
- 1 Teaspoon fresh oregnao (chopped)
- 1 Teaspoon fresh thyme (chopped)
- 1/2 Teaspoon freshly ground pepper
- 1/2 Teaspoon salt
- 1 Teaspoon garlic powder
- 1 Teaspoon paprika
Start by pulling your chicken out of the refrigerator about an hour before you want to cook it. This will allow the chicken to come up to room temperature before cooking which will allow it to cook more evenly.
When you are ready to cook the chicken, preheat your oven to 375°F. Remove the chicken from the package and set it on a cutting board. Pat the chicken dry with a paper towel.
Turn the chicken so that the back of the chicken is facing you. With a sharp knife, starting from the neck, cut along one side of the chicken's spine. Repeat this on the other side to completely remove the backbone.
Now turn the chicken over, using your hand press down on the chicken's breasts to flatten the chicken out.
Take 1 ounce of the softened butter and mix in the salt, pepper, lemon zest, oregano, thyme, garlic powder and paprika.
Now starting from the bottom of the chicken, where the end of the chicken breast is, carefully separate the chicken skin from the breast by gently running your hand under the skin, all the way to the top of the chicken breast. If you tear the skin, it is okay.
Take all of the seasoned butter and rub it on the meat underneath the skin you just separated. Cover the entire chicken with the remaining butter. Season with salt and pepper.
Preheat a 14" cast iron pan, or any large skillet, on medium high heat. Add enough olive oil to the pan to just cover the bottom.
Lay the chicken, skin side down, in the pan and sear until it is golden brown, 4-6 minutes. I like to season the inside of the chicken with more salt and pepper while the front is searing.
Flip the chicken over and place the pan into the preheated oven. Now cook the chicken for approximately 45 minutes, or until the internal temperature reaches 170. Allow it to rest for 10 minutes before carving.
If you do not feel comfortable removing the backbone of the chicken, you can roast the chicken whole. Just increase the time to 1 1/2 hours and check the internal tempertaure. Cook longer if needed.
You can also use sharp kitchen shears in place of the knife. You will use the same technique to remove the backbone.
Thank you for stopping by!